Tag Archives: Business One Help

SAP Business One 8.81 – Purchase Quotations

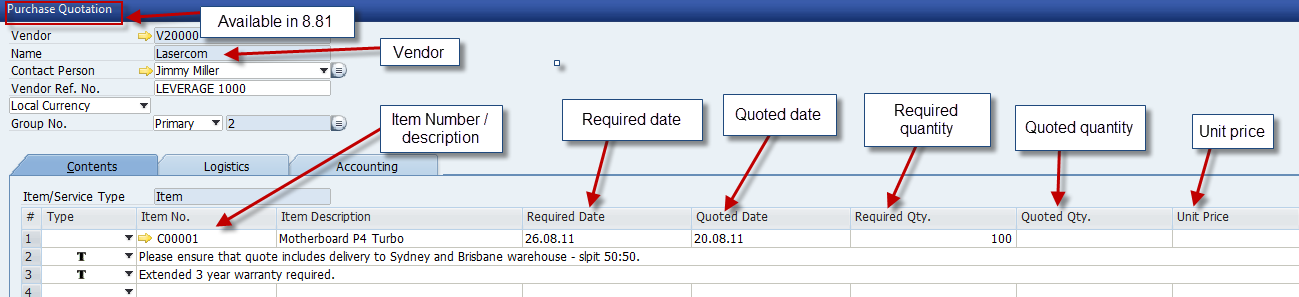
In a tough economic environment most small to medium businesses are looking for better control of their purchasing process. A key area of potential improvement for many businesses is purchase quotations – the ability to ensure that you receive the best possible pricing from your suppliers. The great news is that SAP Business One (version 8.81) includes a new “Purchase Quotation” feature to assist with this process.

This new feature in SAP Business One 8.81 is all about finding the best offer for goods and services based on your criteria of quantity, expected delivery date and price. You compare the quotations received and determine the supplier that you want to order from.


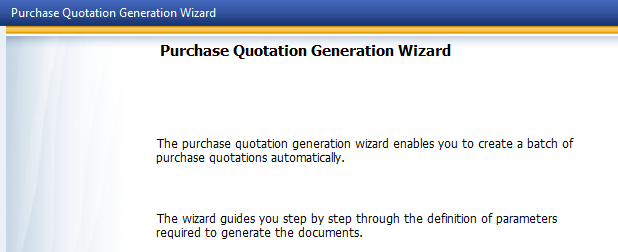
If you want to send the purchase quotation to multiple potential suppliers so that you can compare price, expected delivery dates and other relevant information, SAP Business One 8.81 also includes a Purchase Quotation Generation Wizard. Using the wizard a user can generate multiple purchase quotation requests for different suppliers.

This is the first of several blogs from the team at Leverage Technologies highlighting great new features and functions available in SAP Business One 8.81. More to follow next week…….

SAP Business One Sales Features

In Part one of the sales features for SAP Business One blog we explored the features of the ‘Item Availability Check’ in Business One marketing documents. Two features were left to cover in this instalment – ‘Change to Earliest Availability’ and ‘Display Available-to-Promise Report’

I have used the same IBM printer as in the previous Business One blog but this time I need it from warehouse 01. As you can see from the screenshot below I do not have sufficient available to fulfil this order. What is different however is that there is now a date populated in the ‘Earliest Available’ field. That means that I can select from within SAP Business One the ‘Change to Earliest Availability’ option which will change the deliver date on that line to ‘12/10/10’.

SAP Business One


SAP Business One calculated that earliest available date with the ‘Available to Promise’ Feature in SAP Business One version 8.8. We can explore that calculation and the detail behind it by selecting the ‘Display Available-to-Promise Report’ from the list of options. If we do so we are shown the popup window below:

As you can see the system lists in delivery date order all of the outgoing (committed) movements and incoming (ordered) movements. The ‘available’ column represents a rolling balance of the available stock calculated by adding and subtracting the ‘ins’ and ‘outs’ to the stock physical balance. The document types are prefixed to show at a glance what they are (OR – sales order, PO – Purchase Order, PW – Production Order). The user can also use the orange drill down arrow to access the document and get more detail.

Thanks for reading – I will be posting additional SAP Business One Blogs next week.

Getting more from SAP Business One Distribution

Sales (Marketing Document) features of SAP Business One

In Part one of this blog I would like to explore the automatic availability check and alternative items features offered by SAP Business One within marketing documents. We will use the SAP Business One sales order to illustrate these features.

In the scenario pictured below I have selected a printer from my inventory which is out of stock in the dispatch warehouse. Based on my system preferences, SAP Business One has activated the automatic availability check and popped up the ‘Item Availability Check’ window on the bottom right of the image. This window shows clearly that I have ordered one item and I have none available from warehouse 04. I also have no inbound stock as evidenced by the blank earliest available date. A number of options are available to me in Business One.

I could select ‘Change to Available Quantity’ which would be effective if I had 10 and I needed 20. In this case I have none so we can ignore this option. The options ‘Change to Earliest Availability’ and ‘Display Available-to-Promise Report’ will be covered in part 2 of this blog. If I select ‘Display Quantities in Other Warehouses’ I will get the popup window pictured below.

As you can see, there is stock available in warehouses 01 and 02 which allows me the option of dispatching my order from one of those warehouses or transferring the stock to warehouse 04.  For arguments sake let us assume that it is not economic to fulfil this order with stock from another warehouse.I could then move to the next option on the list which is ‘Display Alternative Items’. That produces the Business One popup window shown below. The user can easily tell from this list that there are three possible alternatives. The quantity available in warehouse 04 is shown and selecting one of the items from the list will replace the incumbent item on the sales order row.

Thanks for reading – in part 2 of this SAP Business One blog (available in the next few days) we will discuss the options ‘Change to Earliest Availability’ and ‘Display Available-to-Promise Report’.

Creating a query in SAP Business One – Part three

Part three- the final part of my blog –  Creating a query in SAP Business One:

Press the next button to move to step 5 of the wizard. This section shows the SQL syntax created by the wizard which will be used to interrogate the database. As users become more advanced with SQL queries, the query can be directly typed rather than generated – that is purely optional. Clicking the ‘Finish’ button will display our report on screen. The syntax is shown again in the top window and can be edited there. We can export this report to Excel by using the standard Excel icon on the SBO toolbar.

SAP Business One Screenshot


This brief tutorial shows how simple it is to extract information customised to the end users requirements directly from SAP Business One. This information can then be formatted in the print layout designer or simply saved as a query which can be viewed on demand.

Thanks for reading – I hope you found this series of three blogs useful. I am in the process of putting together multiple blogs on other technical areas of SAP Business One. Follow the Leverage team on twitter @Leveragetech to get regular updates.

Creating a query in SAP Business One – Part two

Part 2 of my blog – creating a query in SAP Business One. I hope you find the information useful.

When the wizard screen appears press next to move to step 2 of the wizard. Type the name of the table noted earlier in the field as shown below. You will see that the wizard also shows related tables that have additional information related to the business partner master file. These tables hold information such as multiple delivery addresses for customers. We will cover the use of such tables in a future blog.

Press the next button to move to step 3 of the wizard. Either type or tab to browse and select the names of the fields that you noted earlier on in the process. We have selected a range of fields for our query as shown below. Note also that I have asked the system to sort the query by Business Partner Name simply by putting a 1 in the ‘Sort Order’ column next to that field. We can also change the column heading to suit our format simply by typing the desired name into the ‘heading’ field.

SAP Business One Screenshot

Press the next button to move to step 4 of the wizard. This screen is a little more complex because it allows us to place conditions on our query. All that is required is to move through the columns presented and select the appropriate values for our condition. We won’t cover all possible conditions here. We have chosen 1 restriction to apply to this query. The first row is where we have asked the system to only show business partners where the CardType equals ‘C’ representing ‘customer’. We know that ‘C’ is the value for a customer because we moved the mouse over the business partner type field (next to code on the item master) when we were identifying our fields earlier on in this process. We could apply additional conditions by adding additional rows to the Conditions table.

SAP Business One

The final part of this blog will be posted later this week. Thanks for reading.

Creating a SAP Business One SQL Query – Part One

This is part one of my two-part series on creating a basic query in SAP Business One. Over the next few months, I will be providing regular tips and tricks on some of the great functions and features available to users.

Many users of SAP Business One (SBO) are unaware that there is a powerful and simple query generator available within the standard product. The query wizard and the associated query generator are tools that make it easy for authorised users to extract information from the company databases.

There are many reasons why companies would want to query the database but generally, the requirement is to produce a view of the data that does not exist in one of the standard reports offered by SAP or to present the data in a customised format.

Take for example the common requirement to extract a customer listing main contact details. This is a simple task using the query wizard. Let’s take a look how SAP supports this requirement.

The first thing to do is identify the names of the database fields that we want to extract in our query. This is made simple by asking the SAP client to show ‘System Information’. To do this, drop down the ‘View’ menu from within the SBO client and select the ‘System Information’ option so that it shows a tick as indicated in the screenshot below:

Enabling the ‘system Information’ option allows the easy identification of field names and tables in the database simply by moving the mouse over the required data in the SBO screen. Identifying the data names and tables in the database is the most difficult part of the query so SBO has already facilitated the bulk of the report creation activity.

The screenshot below illustrates how this process works. First, move the mouse over the field in SAP Business One and then look in the bottom left-hand corner of the screen to see the information provided by the system about that field.

We can repeat this process by moving the mouse over all the fields that we would like to see in the proposed query and making notes of the field and table names.

Once that process is complete we are ready to create our query. The most accessible tool to do this is the Query Wizard. This can be accessed by dropping down the  ‘Tools’ Menus from the SBO client and selecting queries à Query Wizard as shown below.

Another three steps to go….I will finish the blog with these steps early next week.